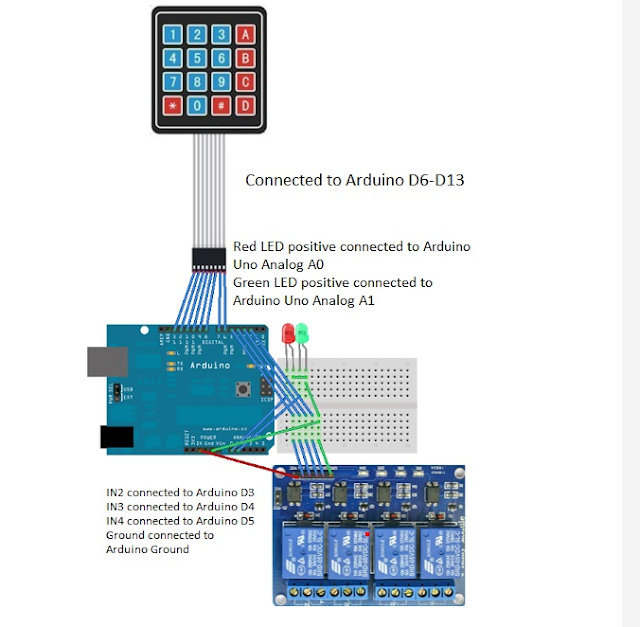
ใบงานที่ 10 arduino หาเอง
ใบรายงานผลการปฏิบัติงาน
1. Code Program ที่เขียนขึ้น ด้วยโปรแกรม Arduino พร้อมอธิบายโปรแกรม
/*
|| Simple Password Entry Using Matrix Keypad
|| 4/5/2012 Updates Nathan Sobieck: Nathan@Sobisource.com
||
*/
//* is to validate password
//# is to reset password attempt
/////////////////////////////////////////////////////////////////
#include <Password.h> //http://www.arduino.cc/playground/uploads/Code/Password.zip
#include <Keypad.h> //http://www.arduino.cc/playground/uploads/Code/Keypad.zip
Password password = Password( "1234" );
const byte ROWS = 4; // Four rows
const byte COLS = 4; // columns
// Define the Keymap
char keys[ROWS][COLS] = {
{'1','2','3','A'},
{'4','5','6','B'},
{'7','8','9','C'},
{'*','0','#','D'}
};
byte rowPins[ROWS] = {13, 12, 11, 10};
byte colPins[COLS] = {9, 8, 7, 6};
// Create the Keypad
Keypad keypad = Keypad( makeKeymap(keys), rowPins, colPins, ROWS, COLS );
void setup(){
Serial.begin(9600);
keypad.addEventListener(keypadEvent); //add an event listener for this keypad
}
void loop(){
keypad.getKey();
}
//take care of some special events
void keypadEvent(KeypadEvent eKey){
switch (keypad.getState()){
case PRESSED:
Serial.print("Pressed: ");
Serial.println(eKey);
switch (eKey){
case '*': checkPassword(); break;
case '#': password.reset(); break;
default: password.append(eKey);
}
}
}
void checkPassword(){
if (password.evaluate()){
Serial.println("Success");
//Add code to run if it works
}else{
Serial.println("Wrong");
//add code to run if it did not work
}
}
3. อธิบายการทำงานของโปรแกรม
ใช้เพื่อสร้างรหัสถอดโค๊ต
4.อ้างอิง
https://www.arduitronics.com/article/31/arduino-with-keypad-and-4-channel-relay


ความคิดเห็น
แสดงความคิดเห็น